Sunday, 28 November 2010

My grandmother's warming hearty vegetable soup


My grandmother


EN FRANCAIS AU BAS DE LA PAGE

My grandmother passed away last Thursday.


She was the eldest of 14 children. She had so many siblings that she had to learn how to take care of them at a very early age. A woman of action for sure she was.

Knitting, embroidering, knitting again, cooking, knitting while talking (very fast, very very fast she used to talk). Devoted to her family she was too. She always knew what everyone was up to. She was the link between us all.

A lot of memories came to my mind in the past few days, along with a good amount of tears.


One of them I wanted to share with you and thought it would be a nice way to keep her with us for a bit longer.


When we came to hers, we would never have a supper without a warm soup for starter, even in the summer!


Her vegetable soup is something I can not forget, and in her honour, I give you the recipe.

I cooked it last night. It was nice to share it.

The smells of the leeks in the pan and of the toasted sourdough bread brought me back to old days in her cold kitchen around the large wooden table…


She would go to the local market and buy beautiful vegetables from local producers. We used to eat it with delicious bread from the countryside “le pain de campagne”, massive slices of dense bread that we would dip in the soup… (You can find “pain poilane” in waitrose in London, toast it and enjoy…)

My grandmother's vegetable soup recipe


Serves 6


1 onion, peeled and chopped
2 leeks, washed and chopped
6 carrots cut in chunks
4 potatoes (about 600g), peeled and cut in chunks
1 large swede, peeled and cut in chunks
1 courgette*
Sea salt
Black pepper
2 TBSP olive oil


In a big saucepan, fry the onion and the leeks with the olive oil until they are transparent. Add the carrots, potatoes and swede. Season with salt and pepper. Cover with cold water and let it simmer for about 45min. Check if the vegetables are soft and if they are, blend the soup with a hand blender. Taste and adjust the seasoning.

Serve very hot and enjoy this hearty warming grandmother’s soup…

*the courgette adds creaminess to the soup. If you can’t find any because it’s not in season, simply leave it out. If you like, you can add a dash of cream to the soup before serving.

En français:


Ma grand-mère est partie jeudi dernier.

Elle était l’aînée de 14 enfants. Cela va sans dire qu’elle a dû très tôt apprendre à s’occuper d’eux, et à être toujours bien occupée !

Tricoter, broder, tricoter encore, cuisiner, tricoter en parlant (en parlant très vite, ah ça oui très vite), jamais elle ne s’arrêtai. Jeudi dernier, elle s’est enfin assise pour se reposer.

Saturday, 27 November 2010

Raw Vitality cookery class

Yes, you could learn how to make this delicious and believe me healthy tart!!

I am very excited to be able to offer my Raw vitality class at Divertimenti cookery school in London.

I will be teaching a great energising and revitilising cookery class there on THURSDAY 20TH JANUARY.


For more information, follow my link:

http://www.sybillepouzet.com/p/i-will-be-offering-raw-and-living-food.html

Tuesday, 23 November 2010

Courgette dip


Courgette and Avocado Dip

En français au bas de la page!

I love dips. Dip a carrot, dip a cracker, dip your finger...
Delicious dips.

What i also love is being able to prepare a delicious dip very quickly!

When icame home tonight, i really felt like a good big salad, with a nice dip.
So i quickly whipped up this one, which is a winner!

It's light, tangy and vibrant.
Avocados are rich in "good" fats and make your skin soft and beautiful...

I did not put any garlic as i am not a big fan, however feel free to incorporate some.
I like to taste the ingredients in their most natural form so i did not add any spices or herbs, again feel free to let your inspiration guide you.

Here is your recipe of the week:


1 courgette, washed, peel on
1 Avocado
1/2 lemon juice
2 TBSP Olive oil
Sea salt
Freshly ground black pepper

Cut the courgette in small chunks. Put in a blender. Add the rest of the ingredients and blend until smooth.
Serve immediately or keep in a small jar in the fridge, should keep for about 2 days.

En Français:

J'adore les dips. Vous connaissez les "dip", non?
En anglais ça veut dire "tremper", tremper une carotte, tremper un cracker, un morceau de pita, ou même le doigt! Le dip, c'est le roi de l'apéro, à servir avec des crudités et des biscuits salés.
Mais c'est aussi le roi de mes salades quotidiennes!
Lassée du houmous trop lourd et difficile à digérer, j'ai trouvée des alternatives.

Thursday, 11 November 2010

Parsnips- Panais


Parsnip crackers

 En français au bas de la page!


I have always loved roasted parsnips but never new that they would be so good prepared raw!


Since I made this discovery, I have been using them in a lot of recipe testing!


I have grated them in salads, reduced them in very small pieces in the food processor to make it look like couscous, but today's experience has been to make some Parsnip crackers.

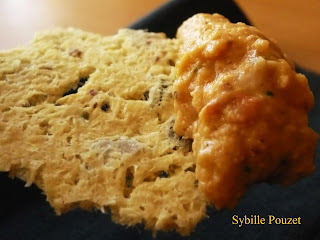
I wanted them to stay quite white so did not mix them with too many ingredients. A bit of lemon to prevent them to oxidise and get grey, a few pumpkin seeds for a bit of crunch, a bit of powdered flaxseeds, a few hours in the dehydrators, et voilà!


Beautiful parsnip crackers, ready to be shared with loved ones (or alone!!).

Parsnips-Panais


Parsnip is a root vegetable related to the carrot. It is sweeter and paler than carrot. Both are native to Eurasia. In Roman time, parsnips were believed to have aphrodisiac powers…


If this still needs to be proven, parsnips have other qualities. They have a very high content of potassium (600mg per 100g) and are richer in vitamins and minerals than carrots. They are also rich in fibers.

You will need a dehydrator to make those crackers.

If you don’t own a dehydrator, you can try the same in your oven at the lowest temperature (usually it doesn’t go down lower than 50°c), it will take less time so check your crackers regularly.


Parsnip crackers


1kg parsnips

4 TBSP olive oil

½ lemon juice

2 TBSP flaxseed (powdered)

2 handfuls of pumpkin seeds

Sea salt and freshly ground pepper to taste


Peel the parsnips.

Cut them in chunks, put in the food processor with the S blade and process until it forms tiny little pieces (or you can grate them finely if you don’t have a food processor).

Add olive oil, salt, pepper, lemon juice and flaxseed powder. Mix again; add a little bit of water if the mixture is too dry (it should form like a paste that you will be able to spread).

Now add the pumpkin seeds and pulse a few times. Don’t process too much as it is nice to keep the pumpkin seeds whole.
Take the mixture out of the mixing bowl and spread it on 2 teflex sheets.

Dehydrate at 145°F for 2 hours and then reduce the heat to 105°f and dehydrate for another 10hours, or until dry and crunchy.

When it’s ready, just break down the crackers into pieces. Keep in a container in the fridge.

Enjoy with your favourite dip, with a salad, or even for breakfast (as it is quite sweet!).


Panais en français:


J’ai toujours adoré les panais rôtis au four mais il ne m’étais jamais venu à l’idée que l’on pouvait les manger crû !

Sunday, 7 November 2010

Om & Yoga

Symbol of OM


 En français au bas de la page!

This morning at the end of the class, someone asked me why we chant OM at the end of the class. This is a question I am very often asked and I thought I would write something up about it, to give some sort of explanation.

Om, actually pronounced "Aum," is an affirmation of the Divine Presence that is the universe and is similar to the Hebrew "Amen."

Om is more an intonation than a word. Its sound transcends the barriers of age, race, and even species. The sacred symbol OM or AUM represents the Universal sound. In the Hindu belief, Om was the sound that was made at the beginning of creation. As the creation began, the divine, all-encompassing consciousness took the form of the first and original vibration manifesting as sound "AUM".

Chanting Om helps us connect with our inner God.

Om is the most important mantra. You can repeat it during meditation.

On a more physical level, the vibrations of the sound Om can be very beneficial. It is made up of three Sanskrit letters: AA, AU and MA, which create the sound Aum or Om. The AA vibrates the heart area. The AU vibrates the back of the throat and lower rear skull. The MA vibrates the top of the skull and fontanelle.

The vibrations can help clear up your sinuses. The rhythmic pronunciation of the sound Om slows down the nervous system and calms the mind. Chanting it on your own brings a sense of connection with your inner self. Chanting it in a group also brings a sense of community.

It is nice to chant Om at the beginning of a class, to calm the mind, prepare it to our practice, and connect with our inner self.

Chanting it at the end brings a lovely closure to the class and prepares to go back nicely to the "outside" world.

The first time I had to chant OM in front of my students, I was petrified. I could have simply omitted this chant, but I really wanted to pass it on to my students. I had to try to really focus on my breath, and on my inner self to let go of my fears of being judged. This OM chant becomes easy and beautiful when it just comes from within, when you are able to let go of the ego, when you let it happen. The sound that I produce sometimes really amaze me, and I sometimes really wonder were it comes from! I also really enjoy feeling the vibrations of the sound in my whole body. It transports me. It gives me peace and makes me feel good.


OM


Sybille.


Pour les Frenchy:

 Ce matin à la fin de mon cours de Yoga, une de mes élèves est venu me demander pour quelle raison on chante OM à la fin du cours (ou au début). On m’a déjà posé cette question plusieurs fois alors j’ai pensé qu’il serai une bonne idée d’écrire quelque chose à ce sujet, pour clarifier un peu tout ça.

Wednesday, 3 November 2010

Wakame & Hijiki


En français au bas de la page!

Have you ever been in a Japanese shop thinking "what the h... is this???" looking at some weird packets of weird black-grey-dead looking stuff???

Well, this has happened to me thousands of times.

However, last week, I conquered my fears and bought 2 packets of strange looking dry ingredients: Wakame and Hijiki.

Dry Wakame (Wakame sec)


Rehydrated Wakame (Wakame réhydraté)


Dry Hijiki (Hijiki sec)

Rehydrated Hijiki (Hijiki réhydraté)

 
Oh yes ok, I admit, I had an idea of what they were, and actually they are quite well known from a lot of us “westerners”.

Anyway I had in mind for a while to create a nice salad with seaweed and as it is going to be part of the menu for my next workshop it was a great opportunity to get into it.

So here I was, recipe testing, experimenting with my “funky” ingredients. I always get really excited to try new (to me) produce; it is a lot of fun!


Before I give you a very easy lovely quick recipe (which is not the one I’ll be teaching), I want to tell you a bit more about sea vegetables and why they have such a “healthy food” reputation.


Sea vegetables grow in the sea and they are harvested close to the coast.


They are about 10 times richer in minerals than land vegetables.

They are a good source of protein, iodine, calcium, potassium, magnesium and iron. They are rich in vitamins A, B, C, D, E and K. The number of calories in a serving is minimal. Consuming them regularly, in small quantities can help stabilize the blood sugar levels, cleanse the intestinal tract, purify and alkalize the blood, cleanse the lymphatic system, rebalance hormones and remove heavy metals from the body.

It is wise not to consume too much of sea vegetables.

Their high content in iodine can potentially lead to make the thyroid hyperactive. People with hyperthyroid are advised not to eat them, or at least in very small quantities.


Sybille’s Wakame and Hijiki salad

 
Serves 2

 
1 TBSP dry wakame

1 Tsp dry hijiki

1 Avocado

6 small button mushrooms (or 3 chestnut mushrooms)

3 handfuls of mixed leaves (or any green salad)

1 handful Mixed sprouts (Alfalfa, mung beans, lentils…)

 
Dressing:

 
Juice of ½ lemon

2 ½ TBSP Tamari*

1 tsp Sesame oil

2 ½ TBSP Olive oil

Black pepper to taste


First put the wakame in a small bowl and cover with water. Set aside for about 15min. It will triple in volume. Do the same with the hijiki.

After 15min, rinse and drain them both and set aside.

 
Now make the dressing. Half of this dressing will be used to marinate the mushrooms.

Mix all the dressing ingredients together.

 
Slice the mushrooms; mix them in a bowl with half of the dressing.

Open the avocado and slice it.

Put the leaves, sprouts, wakame and hijiki in a bowl, add the rest of the dressing and toss well.

Add the mushrooms and the avocado. Mix gently and serve straight away.

 
Bon appétit!

 
*Tamari is a sort of soy sauce made only with fermented soy beans, water and salt. The usual soy sauce contains wheat. Tamari is great for wheat free diets. It is also higher in protein than traditional soy sauce.


Pour les francophones:


Vous es-t- il déjà arrivé d’entrer dans un magasin de produits Japonais ou asiatiques et de penser « mais qu’est ce que c’est donc que cette chose dégoûtante ??? » en regardant quelques uns de ces paquets bizarres contenant des ingrédients gris- noirs- l’air pourri ??

Ca m’est arrivé un sacré nombre de fois !